
How to Rebuild a 16×24 RGB LED Lightbox Safely
, 4 min reading time
, 4 min reading time
Replace a failed RGB LED strip without buying a whole new frame. See the kit contents, check model compatibility, and follow three short installation videos.
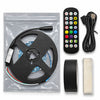
If your 16×24 lightbox has gone dark, you may be able to replace the lighting without buying a whole new frame. This guide shows how the replacement RGB LED strip sits against the existing diffuser, how the mounting tape is used, and what to look for around the corners and wire exit.
A dark frame doesn’t automatically mean the LEDs failed. The outlet, power supply, remote, or a connection could be the problem. Check the outlet and the frame’s normal power controls, and check the remote battery according to the original instructions. Then unplug the frame before looking at its accessible connectors. Don’t open the power adapter or try a random adapter just because the plug fits.
If you see heat damage, exposed conductors, or a damaged adapter, stop using the frame. This kit is for replacing the internal lighting in a compatible frame, not repairing damaged wiring, a power supply, or the frame itself. If your frame is still under warranty, check with the original seller before you alter it.
We designed the kit for most standard 16×24 lightbox frames, but the advertised size alone doesn’t establish fit. If you have a Gallery Panda, V1 Tech, Snapping Turtle Gallery, or other frame, check the interior clearance, the way the strip mounts, and the power requirements and connectors for that exact model. Don’t assume an existing USB port, charger, or adapter will work with the replacement lighting.
If you’re unsure, contact Snapping Turtle Gallery before ordering. Send the brand and model if you know them, along with photos of the frame label, power-adapter label, and accessible connectors. Take those photos with the frame unplugged.
You keep your original frame, diffuser panel, and artwork. The kit is not a replacement for a damaged diffuser or housing.

Unplug the lightbox and use a clean, stable work surface. Set the artwork aside where it won’t get scratched. Follow your frame maker’s instructions to access the diffuser. These clips show the strip and tape at the panel, not how to open every model.
Watch how the strip lines up along the edge of the original diffuser. Check the position before peeling any tape liner. The strip should sit in the intended space without being forced, and the lead should reach its exit without being stretched.
The second clip shows the liner being peeled from the white tape. The exposed adhesive holds the LED strip against the diffuser. Confirm the position first and keep the adhesive clean. The white tape is for mounting the strip; the black tape has a different job.
The final clip shows the strip being pressed into place along the panel edge and corner. Look for the point where the wires exit, then check that they won’t be trapped or pinched when you close the frame. If your frame’s routing differs from the demo, don’t cut or splice wiring to make the kit fit.
If you have a Classic-style frame, the included black tape helps block stray light at the four corner seams. It isn’t a wire repair material.

The 6 ft cable gives you the option to switch the rebuilt lighting from a standard plug-in setup to USB power, if the source matches the kit’s requirements. Do not assume that the cable changes voltage or makes every USB charger or power bank compatible. Confirm the required power source before connecting it. If you can’t verify it, contact us rather than trying different adapters.
Once the assembly is secure and the frame is reassembled according to its original instructions, connect the verified compatible power source. Check basic on/off operation and the RGB colors with the remote. If the lights don’t respond normally or anything gets unusually hot, disconnect power and recheck compatibility before trying again.

Gallery Panda and V1 Tech are named to help shoppers identify their frames. This guide and kit are not affiliated with or endorsed by those brands.
Shop the 16×24 LED Lightbox Rebuild Kit. Check your frame’s fit and power requirements before ordering.


